
Arch Linux Commits to systemd
Posted: 11 October 2012 Filed under: Linux, Other Distributions | Tags: Arch, Slackware, systemd, sysvinits 2 CommentsCan’t say I didn’t see this coming. I converted to pure systemd months ago in my Arch.
According the THIS article at The H website and other sources, it looks like Arch Linux is going 100% systemd. Well, that’s cool. I don’t have any issues with that. I’m not completely sold on systemd yet, but I haven’t found anything to really complain about. I do think it’s a slight poke-in-the-eye to Arch’s KISS approach to GNU/Linux, but that’s just my personal opinion.
Arch isn’t the only distribution that has made this leap. I believe Fedora and SuSE are also moving in that direction. I’m not a developer or coder, so I can’t really tell you what the under-the-hood advantages of systemd over sysvinits may be. However, many folks smarter than I am in that area seem to favor systemd.
There are some holdouts. Patrick Volkerding of Slackware has no plans in the current millennium of getting away from sysvinits in his distribution. Slackware is my primary OS, as you know, so this is OK by me. I don’t believe the Debian folks are considering systemd at this time either. I would actually be shocked if they were. Systemd is too new for Debian. It would be a definite threat to their legendary commitment to stability.
Have a wonderful fall season (spring, if you’re way down south 😉 )!
Later…
~Eric
Common Mozilla Product Profiles Across Operating Systems
Posted: 26 April 2012 Filed under: How-tos | Tags: Arch, common profiles, Firefox, how-to, Mozilla, Seamonkey, Slackware, Thunderbird 2 CommentsBeing able to have common profiles for my Mozilla products across operating systems on my main computer has been a dream for a few years now.
I tried this a few years ago between Slackware and my then secondary OS, Debian (stable). The way I had it set up then worked well until the day that Debian dropped FF and TB from their repos and started using their own IceCritters. Another problem I had back then was that Debian’s Mozilla apps were usually quite a bit older versions than the ones in Slackware. If the versions get too disparate, as they eventually did between Slack and Debian, the common profiles no longer function properly.
Later on, when I adopted Arch Linux as my secondary OS, I tried to run common profiles again. I had forgotten my lesson about needing similar versions of the Mozilla apps for the common profiles to work. Arch is much faster at getting newest versions into their repos than Slackware, so once again I had this version disparity issue. Since Mozilla’s recent change to the update-as-often-as-you-change-underwear schedule, I’ve learned to blacklist Mozila apps in Arch so they don’t get updated. Once Slackware puts out an update (I manualy download and install from current) for the Mozilla applications (Firefox, Thunderbird, Seamonkey), I allow the Arch update to go through.
Now that I have my Slack and Arch Moz versions the same or very similar, the common profiles should work. Below is a look at how I did it on my system. It will, of course, be different on yours, but the principles are about the same.
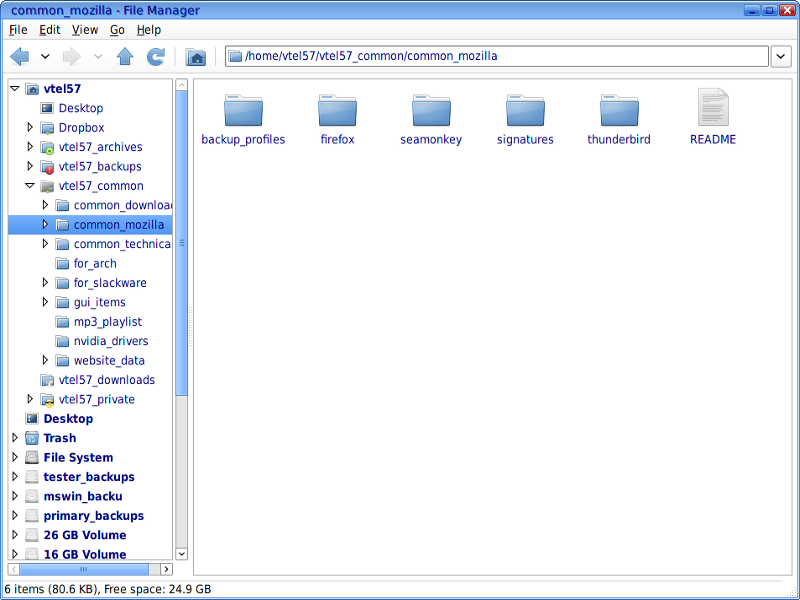
First, I used a common partition on a separate internal hard drive for my common profiles directory.
/home/vtel57/vtel57_common/common_mozilla
This partition automounts within my /home/<user> directory at boot up. You could theoretically use a thumb drive for this, if you wanted to. You’d just have to make sure that it automounts with the proper permissions at boot time.
Next, I copied the firefox and seamonkey directories from my Slackware (main OS) /home/vtel57/.mozilla directory into my newly created /home/vtel57/vtel57_common/common_mozilla directory. I also copied the contents of the .thunderbird directory into a directory called thunderbird also in /home/vtel5/vtel57_common/common_mozilla. You can perform these operations from the command line or in your GUI file manager app, as you prefer.
Now, in the /home/vtel57/.mozilla directory, I renamed the old firefox and seamonkey profiles to inoperative. The old profiles had some random <number/letter>.default as their name. I just added “inop” to the end of that to deactivate them. I did the same with the /home/vtel57/.thunderbird profile. This will prevent the apps from trying to use these old versions.
vtel57_Slackware~/.mozilla/firefox:$ mv 3mvew7qq.default 3mvew7qq.default_inop
Back in the new common directory shown above, I renamed the <number/letter>.default profiles to names that made more sense to me: ff_profile.default, tb_profile.default, and sm_profile.default.
Once I did all of the above, I needed to edit the profile.ini in each original application directory (/home/vtel57/.mozilla/firebird and seamonkey, /home/vtel57/.thunderbird) to point to the newly created common profiles. You can open your favorite gui or command line editor and make these changes to each profile.ini file. Here is my profile.ini for Firefox, for example:
[General]
StartWithLastProfile=1
[Profile0]
Name=default
IsRelative=1 0
Path=<number/letter>.default /home/vtel57/vtel57_common/common_mozilla/firefox/ff_profile.default
Default=1
*change the items in red to the ones in green
So now, whenever I fire up firefox, seamonkey, or thunderbird in either Slackware or Arch, they will be running off the same profiles; meaning all data, preferences, etc. are synch’d. Ain’t it great!?
I’m sure there are easier ways to do this, but this is how I managed it. You can experiment to find what works best for you on your systems.
Have fun!
Later…
~Eric
SSH in Slackware and Arch – a Brief How-To
Posted: 19 March 2012 Filed under: How-tos, Linux | Tags: Arch, computer networking, file transfer, gFTP, openssh, security, Slackware, ssh, ssh protocol 2, ssh-agent, static IP 7 CommentsLet me state right out in the open here that my knowledge of computer networking is lacking. I’m learning as I go.
For most of the time that I’ve used computers in my home, I’ve only had one machine going at any given time. This past year or so, though, I’ve gained two more systems in addition to my main system. I have a laptop and a shop system up and running now in my home. The laptop connects via Ethernet or wireless. The shop system, which is outside in my workshop connects via wireless 100% of the time.
The main OS on all three of these systems is Slackware. For a year now, I’ve been running back and forth with thumb drives or CDs filled with data to keep the systems in sync with one another; mostly my personal documents, music, and Mozilla settings. I occasionally use DropBox for small files, but it’s not feasible for larger stuff due to its slow upload speeds. Cloud computing ain’t never going to work as long as ISPs throttle upload speeds.
Anyway, back when I first got the laptop, I attempted to network it with my main system. I failed miserably and ended up throwing in the towel. You can read about that learning experience in this long thread at Scot’s Newsletter Forums – Bruno’s All Things Linux. You’ll see that quite a few folks there were trying to help the dunderhead get his systems linked. Well, I finally succeeded just this past weekend.
Sometimes, you just have to walk away from a problem for a while. 😉
Here’s how I finally got it working using ssh:
- Make sure that the ssh daemon script is executable so that it will run at boot up
#chmod 755 /etc/rc.d/rc.sshd
- Modify the /etc/ssh/ssh_config as follows:
#vim /etc/ssh/ssh_config
<snip>
# Port 22
Port <your port choice>
# Protocol 2,1
Protocol 2
</snip>
*Either un-comment and change the default port setting and the protocol or just add a line, as I did.
The purpose of this is mostly for security. Changing the port to a port of your choosing enhances your “security by obscurity” chances. Changing to to Protocol 2 is recommended because there are security flaws in Protocol 1.
- Modify the /etc/ssh/sshd_config as follows:
#vim /etc/ssh/sshd_config
<snip>
#Port 22
Port <your port choice>
#AddressFamily any
#ListenAddress 0.0.0.0
#ListenAddress ::
# The default requires explicit activation of protocol 1
Protocol 2
</snip>
- In your router’s Administration preferences (see your manufacturer’s instructions) you’ll need to set each device you plan on linking via ssh to use a static IP address. This has nothing to do with your ISP’s assigned IP address. This is just your home network we’re talking about here. The router assigns an IP to each device hooked to it. In order to ssh into remote devices, you’ll need to make sure the devices’ IP addresses don’t change (static).
That’s it. You are ssh’ing now, my friends.
It’s easy to access your remote machines now.
$ssh <username>@<device name>
Password: *********
The username is the name of the account that your are trying to access on the remote machine, say your wife Debbie’s account. The device name is the domain name of the device. Like this…
#ssh debbie@debbieslaptop01
Once you enter the password for Debbie’s account, you’ll have access to her user data and privileges.
In Arch Linux, the process is a bit simpler. First, make sure you have openssh installed on your Arch system. You still need to modify the ssh_config and sshd_config files in a similar fashion, but the getting the daemon to run at boot time is as simple as just adding “ssh” to your /etc/rc.conf file.
You can manipulate (edit, backup, copy, etc.) files on remote machines using ssh from the command line. However, to transfer files between machines, you might want to use ftp. It’s easier, in my opinion. Personally, I use gFTP in Slackware and Arch for this. There are many other choices out there, though. Use whatever works best for you.
So, there you have it. My next project is going to be adding my printer to my router’s USB connection and setting it up as a network printer for all three of my systems.
Stay tuned…
~Eric
Further reading:
Linux Distros Are Like Lays® Potato Chips… (Revisited)
Posted: 29 January 2012 Filed under: How-tos, Linux | Tags: Arch, Debian, fdisk, gparted, hardrive partitioning, Linux, multi-booting, parted, Slackware, SLAX 2 Comments… you can’t have just one.
Multi-booting – My Way
 I’ve been multi-booting since I first came to Linux. Originally, it was due to my transition from MS Windows to GNU/Linux. Later, it was because I wanted to try more distributions. I was still hunting for the one that fit me best. I’ve since found that distro (Slackware). However, I still have multiple operating systems on my computer for varying reasons.
My current hard drive partition and usage map looks like this:
SATA 1 – Main/Secondary OS + Linux Archive
Primary – 25Gig: /(root) Slackware on /dev/sda1 (ext3)
Primary – 50Gig: /home Slackware on /dev/sda2 (ext3)
Extended – 175Gig: /dev/sda3
Partition – 25Gig: /(root) Debian on /dev/sda5 (ext3)
Partition – 50Gig: /home Debian on /dev/sda6 (ext3)
Partition – 2Gig: /swap (common) on /dev/sda7 (swap)
Partition – 98Gig: Linux Archive on /dev/sda8 (ext2)
SATA 2 – MS Windows + Experimental Operating Systems
Primary – 25Gig: MS Windows Main on /dev/sdb1 (ntfs)
Primary – 25Gig: MS Windows Programs on /dev/sdb2 (ntfs)
Extended – 200Gig: /dev/sdb3
Partition – 2Gig: /swap (common) on /dev/sdb5 (swap)
Partition – 15Gig: /(root) CentOS on /dev/sdb6 (ext3)
Partition – 25Gig: /home CentOS on /dev/sdb7 (ext3)
Partition – 15Gig: /(root) Arch Linux on /dev/sdb8 (ext3)
Partition – 25Gig: /home Arch Linux on /dev/sdb9 (ext3)
Partition – 15Gig: /(root) PCLOS on /dev/sdb10 (ext3)
Partition – 25Gig: /home PCLOS on /dev/sdb11 (ext3)
Partition – 15Gig: /(root) Sidux on /dev/sdb12 (ext3)
Partition – 25Gig: /home Sidux on /dev/sdb13(ext3)
Partition – 15Gig: /(root) Mandriva on /dev/sdb14 (ext3)
Partition – 23Gig: /home Mandriva on /dev/sdb15 (ext3)
EIDE 1 – Backups
Primary – 50Gig: Slackware Backups on /dev/hda1 (ext2)
Primary – 50Gig: Debian Backups on /dev/hda2 (ext2)
Extended – 150Gig: /dev/hda3
Partition – 50Gig: MS Windows Backups on /dev/hda5 (FAT32)
Partition – 50Gig: Other OS Backups on /dev/hda6 (ext2)
Partition – 50Gig: OS Common Storage on /dev/hda7 (FAT32)
These three drives add up to three quarters of a Terabyte of space… way more than I actually need. However, space is cheap these days. I still remember paying $100 for a 10Gig drive less than ten years ago. Previously, SATA 1 and 2 were in RAID 1 (mirrored) configuration with MS Win XP Pro on them. What a waste. I rarely ever boot that OS these days (games only), so I broke the RAID down and repartitioned/reinstalled everything on my system.
The ten partitions you see on the SATA 2 drive are my experimental Linux slots. When this partition map was made, I intended to put CentOS, Arch, and Ark back on them, with the last two saved for Gentoo and maybe FreeBSD. It didn’t work out quite that way, as you can see. What is installed on those experimental partitions tends to change often.
A few things to take note of when partitioning and multi-booting in this fashion:
1) Remember the SATA 15 partition limit. Many newer distros use the libATA kernel drivers which force drive recognition as SATA regardless of whether the drive is EIDE or SATA, so for this reason remember to place your /common partitions and /swap partitions on the lower numbered ones. A libATA distro installed anywhere else on the lower 15 partitions (or another drive) will still be able to “see” and mount them this way.
2) MS Windows is like the “Borg” when it comes to being installed on a computer with other operating systems. It seeks out and destroys other operating systems. Be sure to install MS Windows first. It needs to be on the first partition of whatever drive you’re installing it on. After which, you can install your GNU/Linux distros safely.
3) Install your MBR controlling distribution last, time-wise, regardless of which partition/drive you’re installing on. This will allow it, especially in the case of Debian’s excellent GRUB, to “see” all the other installations and write them into your menu.lst for you. Even though Slackware is my primary operating system, and since I don’t use LILO, I allow Debian to control the MBR and boot my system with its GRUB.
4) Lastly, as in the case above, if your MS Windows installation is on a different drive than your MBR controlling OS, then your BIOS may have troubles booting the correct drive. No matter what you choose in BIOS as the first device, the Windows drive will boot. The reason for this is that Windows installs a bootable flag on its own drive. This flag gets priority from the BIOS. To set a bootable flag on the drive that you want to boot will require a bit of manipulation using a Live Linux CD* and the fdisk command.
Boot your Live CD and start it. From a terminal session within the CD do the following:
# fdisk /dev/
fdisk> a (option to toggle bootable flag on drive
–partition number? 1 (first partition on the drive)
fdisk> w (command to write the new info to disk and exit fdisk)
–bootable flag reset for this drive
This will set the bootable flag to the drive you choose. Reboot, go into BIOS setup and choose your first boot drive. It should boot fine now.
*Another option to use is the way I actually did it on my own system… I used SLAX on a flash drive to perform the fdisk above. Worked like a champ!
Anyway, that’s the way my system is set up. Whenever I add or change operating systems, I just edit the Debian /boot/grub/menu.lst to reflect those changes.
Have fun with it!
Until next time…
~Eric
Note: This article first appeared on my Linux.com Community Blog (now defunct). Some of the above is out-dated. I currently only run Slackware (primary), Arch (secondary), CentOS (tester1), and Debian (tester2).
Tor On Slackware (and Arch)
Posted: 12 September 2011 Filed under: Internet Privacy | Tags: Arch, browsers, copyright, Electronic Frontier Foundation, Firefox, Foxy Proxy, Internet privacy, Linux, proxy servers, Seamonkey, Slackware, Tor 17 CommentsDo you have a need for a bit of privacy when online? Do you want to be a ninny moose? Well, Tor can help you with that.
From Tor’s website:
Individuals use Tor to keep websites from tracking them and their family members, or to connect to news sites, instant messaging services, or the like when these are blocked by their local Internet providers. Tor’s hidden services let users publish web sites and other services without needing to reveal the location of the site. Individuals also use Tor for socially sensitive communication: chat rooms and web forums for rape and abuse survivors, or people with illnesses.
Pay attention to what I’m going to say now… You do NOT have to be a software pirate, a hacktivist, or a foreign operative of some sort to need a bit of privacy. It’s perfectly legal and normal for you to want to protect your privacy when online. You don’t paint your name, address, and phone number on the side of your minivan, do you? You don’t exchange personal data with the clerk at the mall shoe store, do you? Do you tell every caller who calls you on your phone the numbers of the last 10 people you spoke with?
Of course, you don’t do those things. So, why should you do them on the Internet. Your web browser, in many cases, is not your ally in your ongoing effort to protect your privacy online. Often, it is giving away all kinds of interesting info about you with every link you click on. That’s just how it was designed. It’s not an evil conspiracy by the government to track your Internet movements. Although, it is possible for them to do that should they want to. When TCP/IP and the WWW first came about, browsers were required to do these things to function.
If you want a tool that can give you a bit more privacy when you need it, try Tor. Read HERE to understand a bit better how Tor works to protect your privacy. BE AWARE, though… Tor is not the do-all, be-all privacy tool. It has foibles. However, it’s better than having your rear area totally exposed out there in the breeze. Below I will briefly explain how I got Tor up and running in Slackware and Arch Linux using Firefox and Seamonkey browsers with the Foxy Proxy Basic addon.
Slackware
- Download the libevent SlackBuild from SlackBuilds.org.
- Build and install libevent from the SlackBuild.
- Download Tor for Slack 13.37 in x686 or x86_64 versions from Linux Packages | Slackers.it.
- Install the package using pkgtool.
- Start Tor at startx using Xfce’s Session Manager GUI front end. (or start Tor as a service in Slack – /etc/rc.d)
- Download and install the Foxy Proxy Basic addon for FF and Seamonkey.
- Add new proxy in Foxy Proxy – Socks v5, 127.0.0.1, port 9050.
That’s it. You can start the Tor service by typing “tor” in Run Program (Xfce) or at the command line in terminal. Once it’s running, you can use the Foxy Proxy button to turn on the Tor proxy. Once you’ve done that, you can test by using THIS site.
Arch
- Install Tor from Arch repos using Pacman.
- Add Tor to your daemons – (/etc/rc.conf, daemons: …tor…).
- Follow steps 6 and 7 above to configure FF and Seamonkey.
There you go. Simple in Arch, huh? This is wee bit of a project for a neophyte Linux user, but it’s not really that difficult. In Slackware, there are always different ways to do things. If you’re running Slackware, odds are you ain’t no neophyte. In Arch, it’s easier to install and set up. Plus, there’s a Tor section with step-by-step in the always EXCELLENT Arch Wiki to help you.
Enjoy your privacy. Remember, practice safe intercourse, er… I mean Internet.
Later… gotta’ go pirate* some vids now. Just kidding! 😉
~Eric
* The author in no way supports theft of copyrighted materials of any type. A creator’s output is his own to do with as he pleases. If he chooses to freely share, that’s wonderful. If he chooses to limit the sharing and protect his creations by using copyright or other laws, that’s his right also. Taking something that isn’t yours without permission is stealing. Can’t get much plainer than that.
+ Some further reading should you be interested
–> EFF’s Top 12 Ways to Protect Your Online Privacy from the Electronic Frontier Foundation
–> Copyright – Fair Usage