
HTML Coding vtel57.com
Posted: 20 March 2017 Filed under: Browsers, How-tos, Miscellaneous 3 CommentsLast week, while trying to set up my vtel57.com website, I found a nifty tool that some of you might enjoy using.
I had been serving my webpage on Dropbox/Public folder, but due to a change in policies, they’re no longer allowing the serving of static webpages directly from the Public folder. That sucks, but I can understand their reasoning behind this move.
Anyway, I temporarily had the page served on a pal of mine’s server, but it was too inconvenient to nag him every time I wanted to make changes to the page, which I like to do pretty often. As a result of this, I considered paying for a hosting service (HostGator was my favorite option). However, personal finances are a bit strained these days, so I really couldn’t justify the expenditure.
I searched around for some free webpage hosting services, but none really thrilled me. Then, I remembered that WordPress.com offers all the tools and space you need to host a website for personal or business purposes. Pretty COOL! I started a new site on WordPress and began to recreate my original webpage using their templates and tools. In the process, I was having issues with HTML coding of the static main page.
I usually code by hand in Seamonkey/Composer and then save/view the results in the browser portion of that suite. There was a problem, though. I was coding up my main page and then C/P-ing it to the WordPress editor. The results were OK, but with a few bugaboos in the coding, mostly headings and alignment issues. I kept trying to edit/fix this until I realized what the problem was.
WordPress uses HTML5 codes/tags. Seamonkey/Composer uses HTML4. Uh-oh. Well, fine. I could use the WordPress WYSIWYG, but I didn’t really like the way it worked. I like to hand code/edit my HTML. I could have coded in Leafpad (a notepad app I have installed in Slackware), but I can’t preview that way. This is why I like Seamonkey/Composer. With that WYSIWYG, you could hand code and then view the rendered HTML with the click of a button. What I needed was an HTML5 capable WYSIWYG editor.
I searched around, but could not find an app that was totally satisfactory to me. Also, I’ve gotten lazy in my old age and didn’t feel like building an app for Slackware. Then I realized that there were a few really good online (browser implemented) WYSIWYG editors available. I tinkered with two or three and then made my choice. I like the one I picked due to its simplicity and streamlined interface.
I went with HTML5-Editor. Here’s a screenie…

Click on the image to visit the website.
Anyway, it works very well and makes HTML coding chores very simple should you choose to use the WYSIWYG function. And if you like to hand code, the viewer on the right provides real-time rendering. Pretty spiffy.
I know it’s been about 10,000 years since I posted on this blog. Mea culpa. However, I hope that some of my faithful followers (all three of them) will find this post useful.
Have a great day!
~Eric
Some Cookies Are Yummy!
Posted: 31 March 2014 Filed under: Browsers, How-tos, Internet Privacy, Linux, Security | Tags: add-ons, browsing history, cookies, extensions, Firefox, Linux, preferences, privacy, security, site logins, site preferences 10 CommentsNot all browser cookies are bad for you. Many of those little tasty files that get dumped on your system serve a useful purpose.
I am somewhat security conscious when it comes to my surfing habits. I prefer as much privacy as I can manage without ruining my browsing experience. Achieving that can be problematic, though, these days. Yes, I run some privacy extensions like NoScript, Adblock+, Better Privacy, DoNotTrackMe, and FlashBlock in my Firefox browser, but there are also other habits that I have when it comes to using that browser.
I like to clean my snail trails (history, cookies, etc.) occasionally, but unless you have some special settings set in your FF browser Preferences, you’ll be inconvenienced each time you toss your cookies by the fact that you’ll lose your active logins on your favorite oft-visited sites; forcing you to login again after you’ve cleaned and tossed everything.
Of course, you can selectively delete cookies in FF, but if you’ve been surfing for a week or so before you decide to clean things up, you may have hundreds of cookies you’ll have to cull through carefully without tossing your important ones. It’s a pain in the rear end to have to do it that way. There used to be some FF extensions that would “protect” certain cookies for you, but most have not been updated to be functional in the newer versions of FF.
I’m going to show you how you can easily protect your important cookies and login data within FF’s Preferences without the need for another extension or any other mind-boggling procedures. Note: I’m using FF in Linux here. It’s probably similar in MS Windows, but you’ll have to investigate that for yourself.
The following mini-tutorial will be referring to this image:

Click to open in new tab/page
OK, here we go…
In order to be able to dump your cookies and other flotsam and jetsam out of your browser and still retain your favorite website logins and site preferences, you’ll need to do the following within your Firefox Preferences:
- Open your FF Preferences (Menu: File –> Edit –> Preferences) and choose the Privacy tab as shown in the image above.
- Within the Privacy area, use the pull-down menu under History to make the selection shown. This will open up the sub-menu of options just underneath.
- Set your History sub-menu options as you want them to be. NOTE: Where you see “Keep until:” under Accept Cookies, you MUST set FF to “I close Firefox” for this to work at all. If you manually remove all cookies using the Clear Recent History tool (Menu: History –> Clear Recent History) or the Remove All button in Cookie Viewer, then you really will REMOVE ALL COOKIES, even those of your Exceptions white-listed sites (see next step).
- Click on the Exceptions to the right of the box and another small window will pop up showing you what websites are white or black-listed in FF. You should add your favorite sites’ website address as shown in the image above and Allow them. This will allow those sites to retain cookies after automatic cleaning takes place. You can also block sites from installing cookies on your computer by adding the website address and clicking on Block.
If all went will, your Firefox should clean itself (when you close it) of the detritus of browsing and yet retain the login and site preferences for your favorite sites that you had added to the Exceptions list as Allowed in Step 4 above. Now your FF browsing experience will be bit less bothersome for you. Your FF will start back up next time with a clean slate; ready for your day’s surfing pleasure, but you won’t have to re-login to all of your favorite sites. 🙂
As always, comments, corrections, suggestions on better methods, etc. are always welcomed here.
Later…
~Eric
Image credit: screenshot of Firefox Preference setting windows (c) V. T. Eric Layton
Zoom! Zoom!
Posted: 27 March 2014 Filed under: Browsers, How-tos | Tags: Firefox, font size, preferences, visual aids, zoom 5 CommentsMost of you younger folks won’t have to worry about this for a few years, but…
… it’s a reality of life that as you get older, your eyes don’t work as well as they used to. Case in point: when you’re reading those websites with that minuscule font size, you have to grab your cheater glasses to see what’s going on. Unfortunately, not all website developers are nice enough to use a #16 Deja Vu Sans font for us older folks.
In cases like that, there are options. In Firefox, my browser of choice, I can go to Menu: Edit –> Preferences –> Content –> Fonts & Colors – Advanced button and set my font styles and sizes the way I want them to be. This is how I used to do this for many, many years now. However, last night, while poking and prodding FF a bit here and there, I found a neat way to set fonts that don’t affect every website.
The problem with forcing font sizes and types globally in FF is that many web pages, this one right here on wordpress.com, for example, will not display certain characters properly. A while back WordPress, and Photobucket, too, started using these cute little html graphics to identify buttons and menu items. Well, if you’re forcing Deja Vu Sans in FF, those little images show up as weird Greek-looking icons that make no sense whatsoever in relation to their actual assigned purpose. That was beginning to annoy me, particularly at Photobucket, so I stopped forcing fonts and sizes in FF, which allowed the browser to display the websites as they were designed.
Great! Just one problem. Now we’re back to the little font sizes again and the need for me to scramble around in the semi-darkness in the cave here feeling around for my cheater specs. They’re only 1x, but nice to have when you want a little boost in acuity. 😉

Hmm… what to do?
Well, anyone who has used Firefox for any length of time knows, or should know, that you can zoom text and images or just text alone on any web page just by using the combination of CTRL and the + or – keys on the keyboard. You can also do it by holding CTRL while rolling your mousewheel, if you happen to have one. Cool, huh? Here’s my problem, though. I visit many different websites every day. I don’t want to have to be zoom-zooming every time I go there. That’s why I had the global settings set as I did before.
Now for the OH, WOW! moment from the You Learn Something New Everyday department. I found that FF will actually remember zoom setting for individual pages even after you close the browser, log off your system, and climb into bed with hopes of pleasant dreams involving interesting book discussions on a desert island somewhere in a grass hut with a half-shell of coconut wine and this young lady by your side…

Er… but I digress.
Anyway, it’s very cool that FF remembers the zoom settings for individual pages. I haven’t tested it, but my guess is that if you toss your cookies or clear out your site preferences using the Clear Recent History tool, you’ll probably lose all those individual zoom settings and have to set them all over again as you visit the sites. Still, it’s COOL. I’m glad I found out how to do this. Now I don’t have to force fonts and sizes in FF and all the little weird characters makes sense again.
Ain’t technology wonderful?!
Later…
~Eric
Image credits: reading glasses clipart courtesy of http://www.clker.com/
Island girl courtesy of http://island-girl-boutique.com/ – used without their express permission, but hopefully they’ll cut me some slack on that because I’m posting a link for their fine establishment here on my very popular 500+ million hit-a-day blog site. 😉
SmoothWheel – Firefox Extension
Posted: 9 January 2014 Filed under: How-tos, Miscellaneous | Tags: Avi Halachmi, Firefox, Firefox extension, high CPU usage, image scrolling, jerky scrolling, smooth scrolling, SmoothWheel Leave a commentWell, I don’t usually jump for joy about Firefox extensions; however, in this case…
![]()
For quite some time now, I’ve experienced herky-jerky scrolling and excessive CPU hogging in Firefox. It’s been very annoying. Some versions seem to fix it, then in a few weeks, when there’s another update, the jerkiness comes back. This happens to my Firefox in Slackware Linux, but I’ve experienced it in other distributions and in MS Windows, also. I’ve tweaked till I was nearly blind. I’ve searched for remedies all over the Internet. I’ve done the usual suggested “Safe Mode” operations and disabling selected extensions here and there to try to get FF to behave. Nothing has worked, until tonight…
I decided to install an extension that was recommended to me by someone quite some time ago. I apologize to that person here and now for not believing that this extension would resolve the issue. I had enough extensions. I didn’t really want another one. Well, a couple weeks ago I lightened the extension/addon load on my FF down to about 1/3 of what it was; just some Profile house-cleaning. It needed to be done. So now I have my leaner meaner FF to work with here. I decided to install this smooth scrolling extension and see if it would actually work as advertised.
The extension is called SmoothWheel by Avi Halachmi. Right out of the box, it performed miracles on my FF. I didn’t even have to adjust the pre-set preferences. I mean this thing works! I can pull up a Bing Image search page for “cleavage” now and FF will scroll just as smoothly as all the curves on that search result page. It’s wonderful! I love my FF again. Thank you Avi! By the way, the $5 donation he asks for is well-worth it.
So there, you have it…
~Eric
Image credits: “Squee” jumping emoticon by CookiemagiK (Joel) on devianART
Disabling Your Touchpad In Slackware (KDE)
Posted: 18 November 2013 Filed under: How-tos, Slackware | Tags: disabling touchpad, KDE, laptop touchpad, Slackware, typing 11 CommentsEver been typing along somewhere and have your cursor jump across the page because your thumb hit the touchpad on your laptop accidentally?
Well, on some of those high priced commercial operating systems like Windows or MacOS there might actually be a setting or a keyboard shortcut that disables your touchpad. Us Slackware users are made of stronger stuff than most. We don’t want no silly buttons and keyboard shortcuts. We want scripts and command line stuff, right? We like to do things down at the nitty-gritty level of computing.

So, with that in mind, if you’re running Slackware/KDE, you can make yourself a nice little script that will disable your laptop’s touchpad and you’ll never have to cuss again when that cursor goes zooming across the screen while you’re typing that flaming post on USENET to that know-it-all Ubuntu dev.
Here’s what you do…
First check to see if you have a /home/<username>/.kde/env directory. If you don’t, create it:
you@your_system ~:$ cd .kde
you@your_system ~:$ mkdir env
You can also do this graphically, if you prefer, but we know you hardcore Slackers don’t do things graphically now, do you? 😉
Anyway, once you’ve determined that you have the directory or have created one, you can now create the simple little script to place in there that will KILL that annoying touchpad.
Using vi, vim, or whatever editor you like, create this small file:
#!/bin/bash
synclient TouchpadOff=1
Save the file as “myenv.sh” in your /home/username/.kde/env directory. Make sure it is executable:
you@your_system ~:$ chmod 755 myenv.sh
Log out of your current KDE session and log back in. The touchpad from HELL is now as dead as weird uncle Bob’s hairpiece. WOO-HOO!
For those of you who occasionally use your laptop sans an external mouse, you can always revive the touchpad by changing the permissions on the myenv.sh file or just renaming it to myenv.inop. Since “inop” is an extension that the operating system does not recognize, it just ignores it. I’ve used “inop” to kill executables since way back in my Windoze daze. It works fine.
Anywho, I hope this little trick will make your Slackware/KDE computering that much more enjoyable. Oh, and I cannot take credit for this at all. A member of the kde.org forums called google01103 posted this tip in a thread over there about disabling that pesky touchpad. Credit where credit is due. That’s my motto.
Have fun…
~Eric
Image credits: toilet laptop user – source/ownership unknown = If you own this image, please contact me regarding permissions/copyrights. ~Eric
Bond, James Bond @ Encrypted Email 4 You
Posted: 30 August 2013 Filed under: How-tos, Internet Privacy | Tags: Edward Snowden, email privacy, encryption, Enigmail, NSA, OpenPGP, privacy, public key, tips 3 CommentsSo, you want a little more privacy in your email communications with grandma, huh? Don’t want those pesky NSA analysts snarfing up that chocolate chip cookie recipe?
Well, this article is just what you need.
Recently, over at Scot’s Newsletter Forums, we were discussing email encryption options and methods. It’s a fun thread. Give it a looksee. There is some good info and some useful links to be had. For me, this is the culmination of all the recent stories regarding NSA and FBI email and Internet snooping spurred by the revelations of ex-NSA contractor, and current guest of Mr. Putin, Edward Snowden.
People should be more conscious of their privacy, I think. You’d be amazed how many people think that email is private. I asked five of my family and friends about this in the past couple days. Everyone of them thought email was at least as private as 1st class USPS mail (snail mail). None of these folks were technical types. They were just aunts, truck drivers, etc… everyday people. Sadly, I’d bet that many techies out there are just a confident of the privacy of their emails.
With all this in mind, I’m here today to enlighten you just a bit about email privacy (or lack thereof) and simple, yet very secure, methods you can use to ensure that what you send to grandma will only be read by grandma. We’re going to talk a bit about email encryption using OpenPGP. You can do this in GNU/Linux, MS Windows, or MacOS. Encryption works everywhere for the most part. You just need a couple tools to make it happen.

The Cone of Silence
My focus is on the Thunderbird email client using the Enigmail extension in GNU/Linux, Slackware to be specific. However, encrypting of emails and attachments is not difficult in any operating system. You just may have to use different means and applications to achieve it. Enigmail uses a protocol called OpenPGP. It is a very secure means of encrypting email and other documents using the Pretty Good Privacy data encryption method.
Security In-a-Box has created an excellent illustrated tutorial for setting up Enigmail in Thunderbird. I wouldn’t even attempt to top that one. Click on the hyperlink and learn very quickly and easily what you need to do to set this all up for yourself. In a matter of a few minutes, you can have your T-bird set up and capable of sending/receiving encrypted emails to your family, friends, workmates, etc.
For you MS Windows folks, there are also options. Windows Mail has a short FAQ regarding digitally signing and encrypting emails. It’s concise but informative. If you want to utilize OpenPGP in MS Windows, you can also do that thanks to the German government for creating an app called Gpg4win that allows you to set up and use OpenPGP in MS Windows just as you would in Linux.
There are quite a few good websites that explain email encryption, its methods, and the tools necessary to perform this feat. Here are a few to help you understand how this stuff works:
- Why Should You Encrypt Your Email – About.com
- How to Encrypt Your Email – PCWorld
- How Do I Send Encrypted Email – Ask Leo
It might seem complicated, and the encryption part is pretty heavy stuff mathematically speaking; however, to actually utilize the tools available to encrypt your email and documents is not at all complicated. You drive your car yet you have no clue how the internal combustion engine works, right? Well, there you go. You don’t have to be Einstein to encrypt your emails. C’mon! Even grandma is doing it. Give it a try. Encryption can be FUN! And remember…
Privacy is a right.
Security is YOUR responsibility.
Trust no one. Encrypt everything.
Have some fun with it. You might even learn a thing or two. 🙂
Later,
~Eric
Image Credits: The Cone of Silence from the Get Smart television series. Image ownership unknown. Used without express permission. Contact author if this is a copyright violation. Image will be removed.
Don’t let KAOS read your mail. ![]()
iFixit – Very COOL!
Posted: 2 November 2012 Filed under: How-tos, Tech General | Tags: Apple, greed, HowStuffWorks, iFixit, rant, repair 6 CommentsWhile perusing my latest issue of Mother Jones today, I came across a great article about the iFixit website and the fix rather than replace movement.
Wow! What a refreshing idea; fix something rather than toss it in a landfill and purchase another. Who’d a-thunk it? Well, let me brief you younger folks on a bit of history…
Back in the Dark Ages… oh, say 25 years ago or so… we used to actually fix things. Yup. That’s right. When your dad’s Sony Walkman or mom’s Singer sewing machine stopped working for some reason, they’d take it into a shop where a repair person*, with actual knowledge of the device and real tools, would sit at a work bench and troubleshoot and fix the issue for them. Awesome, huh? Then, dad and mom would pay a small price (compared to the price of a replacement) and take their Walkman or sewing machine home for many more years of use and enjoyment.
Now, why did such a remarkably sensible solution to broken items go the way of the T-Rex? Well, it’s simple. Greed. Yup. That’s right. You youngsters may have heard me gripe about greed before. It’s an all-pervasive sickness in this world at the moment. I’m not here to bitch today, though. I’m here to tell you about a really cool website that might appeal to you tech nerds and geeks out there.
iFixit – it’s sorta’ like a Wikipedia for fixing stuff. Between this site and another old favorite of mine, How Stuff Works, you should  be able to fix just about anything in your home, as long as you have the skills and can get the parts needed to do the fix. Fixing things yourself is rewarding. You feel you accomplished something. Wouldn’t it be cool to be able to fix that favorite old laptop of yours with the jammed up keyboard? You can do it. It could actually be rocket science, but hey… rockets aren’t that complicated. Really! 😉
Well, next time you play with your little iThing, think about the 11 year old Chinese girl who works 16 hour shifts in the factory that makes that thing. Think about the entire countrysides laid waste by the mining of rare earths to make that thing work. Think about all your friends and neighbors who would love a job in a factory that makes stuff instead of some dead-end job in a cubicle farm of some call center. When your iThing breaks, FIX IT! That’ll piss Apple off, huh? Heh-heh…
Later…
~Eric
*For 20+ years I was a component level electronics repair technician. That career no longer exists in the U.S. because very little is actually repaired here anymore. It’s a sad thing. 😦
Image credits: Technician from clipartheaven.com.
Common Mozilla Product Profiles Across Operating Systems
Posted: 26 April 2012 Filed under: How-tos | Tags: Arch, common profiles, Firefox, how-to, Mozilla, Seamonkey, Slackware, Thunderbird 2 CommentsBeing able to have common profiles for my Mozilla products across operating systems on my main computer has been a dream for a few years now.
I tried this a few years ago between Slackware and my then secondary OS, Debian (stable). The way I had it set up then worked well until the day that Debian dropped FF and TB from their repos and started using their own IceCritters. Another problem I had back then was that Debian’s Mozilla apps were usually quite a bit older versions than the ones in Slackware. If the versions get too disparate, as they eventually did between Slack and Debian, the common profiles no longer function properly.
Later on, when I adopted Arch Linux as my secondary OS, I tried to run common profiles again. I had forgotten my lesson about needing similar versions of the Mozilla apps for the common profiles to work. Arch is much faster at getting newest versions into their repos than Slackware, so once again I had this version disparity issue. Since Mozilla’s recent change to the update-as-often-as-you-change-underwear schedule, I’ve learned to blacklist Mozila apps in Arch so they don’t get updated. Once Slackware puts out an update (I manualy download and install from current) for the Mozilla applications (Firefox, Thunderbird, Seamonkey), I allow the Arch update to go through.
Now that I have my Slack and Arch Moz versions the same or very similar, the common profiles should work. Below is a look at how I did it on my system. It will, of course, be different on yours, but the principles are about the same.
First, I used a common partition on a separate internal hard drive for my common profiles directory.
/home/vtel57/vtel57_common/common_mozilla
This partition automounts within my /home/<user> directory at boot up. You could theoretically use a thumb drive for this, if you wanted to. You’d just have to make sure that it automounts with the proper permissions at boot time.
Next, I copied the firefox and seamonkey directories from my Slackware (main OS) /home/vtel57/.mozilla directory into my newly created /home/vtel57/vtel57_common/common_mozilla directory. I also copied the contents of the .thunderbird directory into a directory called thunderbird also in /home/vtel5/vtel57_common/common_mozilla. You can perform these operations from the command line or in your GUI file manager app, as you prefer.
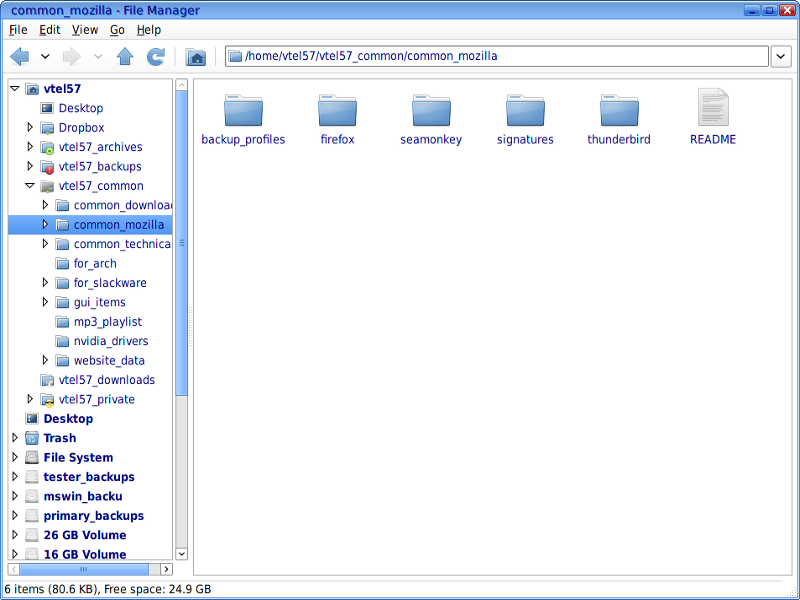
Now, in the /home/vtel57/.mozilla directory, I renamed the old firefox and seamonkey profiles to inoperative. The old profiles had some random <number/letter>.default as their name. I just added “inop” to the end of that to deactivate them. I did the same with the /home/vtel57/.thunderbird profile. This will prevent the apps from trying to use these old versions.
vtel57_Slackware~/.mozilla/firefox:$ mv 3mvew7qq.default 3mvew7qq.default_inop
Back in the new common directory shown above, I renamed the <number/letter>.default profiles to names that made more sense to me: ff_profile.default, tb_profile.default, and sm_profile.default.
Once I did all of the above, I needed to edit the profile.ini in each original application directory (/home/vtel57/.mozilla/firebird and seamonkey, /home/vtel57/.thunderbird) to point to the newly created common profiles. You can open your favorite gui or command line editor and make these changes to each profile.ini file. Here is my profile.ini for Firefox, for example:
[General]
StartWithLastProfile=1
[Profile0]
Name=default
IsRelative=1 0
Path=<number/letter>.default /home/vtel57/vtel57_common/common_mozilla/firefox/ff_profile.default
Default=1
*change the items in red to the ones in green
So now, whenever I fire up firefox, seamonkey, or thunderbird in either Slackware or Arch, they will be running off the same profiles; meaning all data, preferences, etc. are synch’d. Ain’t it great!?
I’m sure there are easier ways to do this, but this is how I managed it. You can experiment to find what works best for you on your systems.
Have fun!
Later…
~Eric
Midori On Slackware – Using SlackBuilds
Posted: 10 April 2012 Filed under: How-tos, Slackware | Tags: icu4c, libsoup, libunique, Midori, Salix OS, SlackBuilds, Slackware, vala, Webkitgtk, Zorin OS 6 CommentsYes, I’m still on spring hiatus, but the place was getting to look a bit run down.
Plus, I wanted to show you all how to install this cool little browser that I found called Midori. Oh, it’s nothing new. It’s been around for a while, but it’s new to me. I first found it while using Salix OS recently on one of my tester partitions. I’m also using it in Zorin OS on one of my laptops. It’s fast. It’s pretty simplistic and minimal, too.
It is a bit complicated to install on Slackware, though. However, I’m sure you can do it. It just requires using some excellent SlackBuild scripts provided by the dedicated folks at SlackBuilds.org. Unfortunately, Midori is not one of those apps that you can install with just one SlackBuild. It has some dependencies… and its dependencies have some dependencies.
That always complicates things a bit, particularly in Slackware where you have to be smart enough to resolve dependency issues on your own. There is no a gaggle of volunteer repo maintainers doing it for you. That’s alright, though. Slackers are known to be smart and tough. We can take it. Dependency H3LL don’t scare us none. 😉
Let’s get started, OK?
Fire up your current browser and navigate to SlackBuilds.org. You know the place. You’ve been there before. Once you’re there, you’re going to search and download six different SlackBuild scripts and their related source tar balls. Got that? OK.
Here they are (click for the SlackBuilds.org page for each one):
Midori is your ultimate goal. It requires webkitgtk, libunique, and vala. The others are dependencies of webkitgtk and will have to be built first and installed before you build webkitgtk.
You should be familiar with the whole SlackBuild thing by now. Just in case, though, I’ll run through one for you.
Let’s build libunique first:
1. Download the source and the SlackBuild
2. Decompress the SlackBuild (using Xarchiver or your favorite tool)
3. Move the newly untar’d directory to your favorite temporary build directory
4. Move the libunique source package to the untar’d libunique SlackBuild directory (see Fig. 1)
Figure 1

5. Open a terminal and make the script executable:
# chmod +x *Build
6. Execute the script:
# sh *Build
NOTE: If you’re building on a 64 bit Slackware, you should use the prefix Arch=x86_64. For example: # Arch=x86_64 sh *Build
7. Once the script completes, using Slackware’s pkgtool to install the newly created .tgz package you’ll find in your /tmp directory:
# installpkg libunique*
NOTE: You might also want to keep these packages somewhere safe in case you ever want to reinstall Midori on this system or another Slackware installation somewhere.
Now, we need to build and install the rest of the dependencies in this order: icu4c, libsoup, vala. Once you’ve built and installed these guys, you can then build and install webkitgtk. Something to keep in mind once you begin your webkitgtk build; it is NOT one of those zippity-fast builds. Even on a fast system, it may take 45 minutes to build. Just be patient. Don’t sit there waiting for the pot to boil. Go have some dinner or take a healthy walk around the neighborhood while it builds.
OK, assuming you’ve managed to build and install libunique, icu4c, libsoup, vala… and then webkitgtk, you should now be able to build and install midori. It’s a pretty fast build, less than 1/2 a minute. Install it using pkgtool, as you did with the others above. If all went well, you should have a nice working Midori browser on your system now. If you run Xfce4 like I do, it will automagically show up in the Menu –> Network sub-menu.
Here’s my Midori running with the Midori Home Page opened:
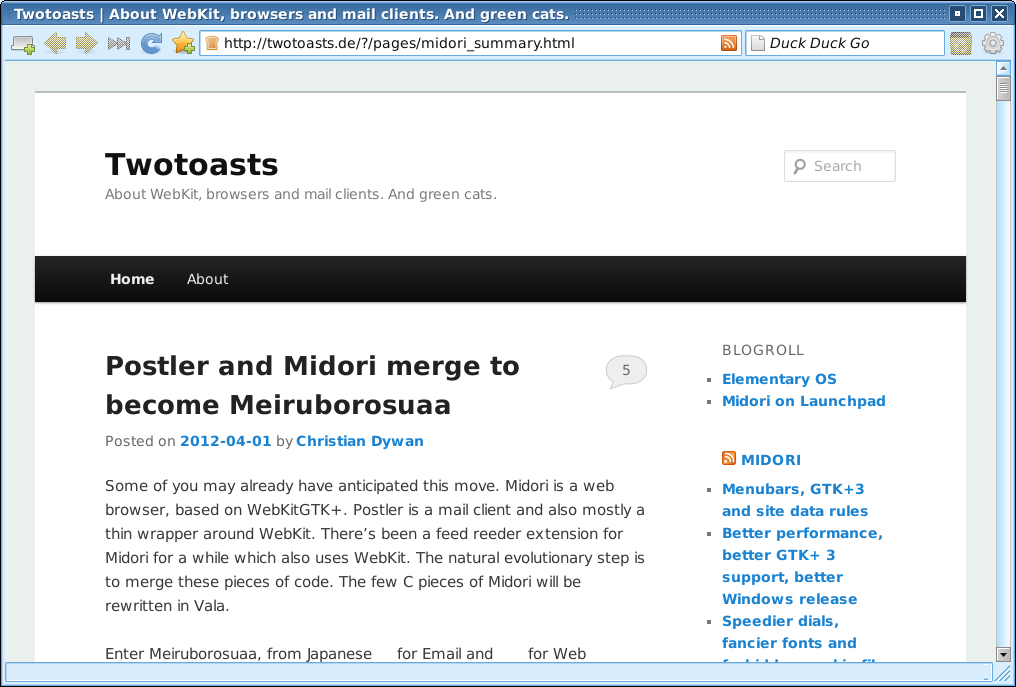
NOTE: That’s an April Fools post you’re seeing there about merging Midori with Postler. 😉
Have lots of FUN! 🙂
~Eric
P.S. I’m going back on hiatus now. See you again soon…
SSH in Slackware and Arch – a Brief How-To
Posted: 19 March 2012 Filed under: How-tos, Linux | Tags: Arch, computer networking, file transfer, gFTP, openssh, security, Slackware, ssh, ssh protocol 2, ssh-agent, static IP 7 CommentsLet me state right out in the open here that my knowledge of computer networking is lacking. I’m learning as I go.
For most of the time that I’ve used computers in my home, I’ve only had one machine going at any given time. This past year or so, though, I’ve gained two more systems in addition to my main system. I have a laptop and a shop system up and running now in my home. The laptop connects via Ethernet or wireless. The shop system, which is outside in my workshop connects via wireless 100% of the time.
The main OS on all three of these systems is Slackware. For a year now, I’ve been running back and forth with thumb drives or CDs filled with data to keep the systems in sync with one another; mostly my personal documents, music, and Mozilla settings. I occasionally use DropBox for small files, but it’s not feasible for larger stuff due to its slow upload speeds. Cloud computing ain’t never going to work as long as ISPs throttle upload speeds.
Anyway, back when I first got the laptop, I attempted to network it with my main system. I failed miserably and ended up throwing in the towel. You can read about that learning experience in this long thread at Scot’s Newsletter Forums – Bruno’s All Things Linux. You’ll see that quite a few folks there were trying to help the dunderhead get his systems linked. Well, I finally succeeded just this past weekend.
Sometimes, you just have to walk away from a problem for a while. 😉
Here’s how I finally got it working using ssh:
- Make sure that the ssh daemon script is executable so that it will run at boot up
#chmod 755 /etc/rc.d/rc.sshd
- Modify the /etc/ssh/ssh_config as follows:
#vim /etc/ssh/ssh_config
<snip>
# Port 22
Port <your port choice>
# Protocol 2,1
Protocol 2
</snip>
*Either un-comment and change the default port setting and the protocol or just add a line, as I did.
The purpose of this is mostly for security. Changing the port to a port of your choosing enhances your “security by obscurity” chances. Changing to to Protocol 2 is recommended because there are security flaws in Protocol 1.
- Modify the /etc/ssh/sshd_config as follows:
#vim /etc/ssh/sshd_config
<snip>
#Port 22
Port <your port choice>
#AddressFamily any
#ListenAddress 0.0.0.0
#ListenAddress ::
# The default requires explicit activation of protocol 1
Protocol 2
</snip>
- In your router’s Administration preferences (see your manufacturer’s instructions) you’ll need to set each device you plan on linking via ssh to use a static IP address. This has nothing to do with your ISP’s assigned IP address. This is just your home network we’re talking about here. The router assigns an IP to each device hooked to it. In order to ssh into remote devices, you’ll need to make sure the devices’ IP addresses don’t change (static).
That’s it. You are ssh’ing now, my friends.
It’s easy to access your remote machines now.
$ssh <username>@<device name>
Password: *********
The username is the name of the account that your are trying to access on the remote machine, say your wife Debbie’s account. The device name is the domain name of the device. Like this…
#ssh debbie@debbieslaptop01
Once you enter the password for Debbie’s account, you’ll have access to her user data and privileges.
In Arch Linux, the process is a bit simpler. First, make sure you have openssh installed on your Arch system. You still need to modify the ssh_config and sshd_config files in a similar fashion, but the getting the daemon to run at boot time is as simple as just adding “ssh” to your /etc/rc.conf file.
You can manipulate (edit, backup, copy, etc.) files on remote machines using ssh from the command line. However, to transfer files between machines, you might want to use ftp. It’s easier, in my opinion. Personally, I use gFTP in Slackware and Arch for this. There are many other choices out there, though. Use whatever works best for you.
So, there you have it. My next project is going to be adding my printer to my router’s USB connection and setting it up as a network printer for all three of my systems.
Stay tuned…
~Eric
Further reading: